TensorFlowが推奨しているTFRecordというデータセットのフォーマットがあります。
TFRecordを使いこなせるようになると、大規模なデータを効率的に学習できるようになることがあります。
本記事では、TFRecordの使い方をマスターできるように読み書きする方法を解説し、実際にQueueRunnerを使った実装をしてみます。
TFRecordを使用する理由
TFRecordの中身はProtocol Bufferというバイナリフォーマットです。一度TFRecordを作成することで、データの生成・加工コストを下げられる場合があります。また、TFRecordの形式を使うことでCloud ML Engine用の入力データ形式として使うこともできます。
TensorFlowで機械学習するとき、学習データセットを読み込むには以下の方法があります。
(1) 事前にメモリに全データをロードする
(2) Pythonコードで少しずつ読み込みながらfeed_dictでグラフに入力する
(3) TFRecordからグラフ上でThreadingとQueues [1] を活用しながら読み込む
(4) Dataset APIを使用する
(1)はデータセットが小さい場合には効果的です。たった一度だけファイルをメモリ上に読み込めば、高速にグラフに入力することができます。しかしながら、データが大きくなったときにメモリが圧迫されると処理速度の低下やメモリアロケーションエラーが発生する場合があります。
(2)もプロトタイプとして簡易的に実装したい場合には何度もTFRecordを作成する手間が省けるので良いアイデアです。しかし、シングルスレッドで動作させている場合にはデータ読み込みと学習を同期的にしてしまう場合があるため、全体の学習時間が長くなってしまう場合があります。また、機械学習モデルを変更したり、チューニングをする際には同じ処理を何度もすることになることがあります。毎回同じようなデータ加工処理を走らせている場合には、TFRecordを作成することを検討しましょう。
TFRecordを使用する場合、(3)や(4)の方法でTensorFlowの計算グラフに入力していくことになります。計算グラフ上ではマルチスレッドのキューが使用されるために、学習とデータセットの読み込み・加工を非同期で行うことができます。
TFRecordの作り方
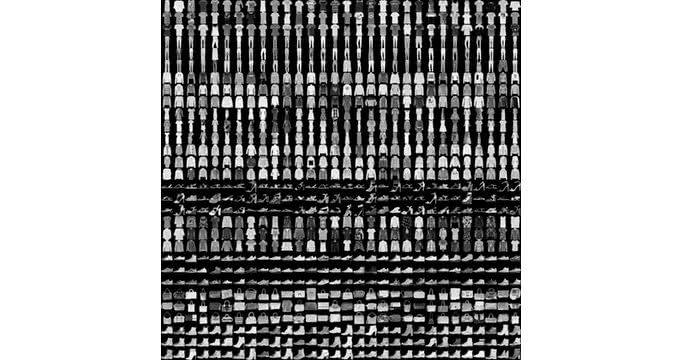
それでは早速TFRecordを作成していきましょう。今回は、Fashion MNIST [2] を例にTFRecordの作り方を学んでいきましょう。Fashion MNISTは、以下のような28×28の10種類の服画像を分類するデータセットです。
Fashion MNISTのページにリンクが貼ってあるので、data/fashionディレクトリを作成して保存します。
$ mkdir -p data/fashin
$ cd data/fashion
$ wget http://fashion-mnist.s3-website.eu-central-1.amazonaws.com/train-images-idx3-ubyte.gz
$ wget http://fashion-mnist.s3-website.eu-central-1.amazonaws.com/train-labels-idx1-ubyte.gz
$ wget http://fashion-mnist.s3-website.eu-central-1.amazonaws.com/t10k-images-idx3-ubyte.gz
$ wget http://fashion-mnist.s3-website.eu-central-1.amazonaws.com/t10k-labels-idx1-ubyte.gz
$ cd ../..
こうすることで、MNISTと同じようにTensorFlowからコードを読み込むことができるようになります。
from tensorflow.examples.tutorials.mnist import input_data

fashion_mnist = input_data.read_data_sets('data/fashion')
ExampleレコードとSequenceExampleレコード
TFRecordは、tf.train.Exampleとtf.train.SequenceExampleを1つのレコードの単位として書き込みます。tf.train.Exampleは数値や画像などの固定長のリストを扱います。各レコードの値はtf.train.Featureで指定します。tf.train.Featureの使用できるデータ型は以下のとおりです。
- tf.train.Int64List
- tf.train.FloatList
- tf.train.BytesList
以下のように[value]とリストの中に値を指定します。
tf.train.Example(features=tf.train.Features(feature={
    'height': tf.train.Feature(int64_list=tf.train.Int64List(value=[height])),
    'width' : tf.train.Feature(int64_list=tf.train.Int64List(value=[width])),
    'depth' : tf.train.Feature(int64_list=tf.train.Int64List(value=[depth])),
    'image' : tf.train.Feature(bytes_list=tf.train.BytesList(value=[image]))
}))tf.train.SequenceExampleは固定長のcontextと可変長のfeature_listsを持つデータ形式となります。テキストや時系列などのシーケンシャルデータを学習する場合にはtf.train.SequenceExampleを使用しましょう。
example = tf.train.SequenceExample()
# 固定長の値はcontext経由
example.context.feature["length"].int64_list.value.append(len(data))

# 可変長のデータはfeature_lists経由で指定
words_list = example.feature_lists.feature_list["words"]
for word in words:
    words_list.feature.add().int64_list.value.append(word_id(word))
Fashion MNISTをTFRecord化してみる
Fashion MNISTをTFRecordの形式で保存してみます。以下のようにnumpy配列の場合はtobytes()メソッドを使用することでリストをBytes形式に変換することができます。
import numpy as np
import tensorflow as tf
from tensorflow.examples.tutorials.mnist import input_data

def make_example(image, label):
    return tf.train.Example(features=tf.train.Features(feature={
        'image' : tf.train.Feature(bytes_list=tf.train.BytesList(value=[image])),
        'label' : tf.train.Feature(bytes_list=tf.train.BytesList(value=[label]))
    }))

def write_tfrecord(images, labels, filename):
    writer = tf.python_io.TFRecordWriter(filename)
    for image, label in zip(images, labels):
        labels = labels.astype(np.float32)
        ex = make_example(image.tobytes(), label.tobytes())
        writer.write(ex.SerializeToString())
    writer.close()

def main():
    fashion_mnist = input_data.read_data_sets('data/fashion', one_hot=True)
    train_images  = fashion_mnist.train.images
    train_labels  = fashion_mnist.train.labels
    test_images   = fashion_mnist.test.images
    test_labels   = fashion_mnist.test.labels
    write_tfrecord(train_images, train_labels, 'fashion_mnist_train.tfrecord')
    write_tfrecord(test_images, test_labels, 'fashion_mnist_test.tfrecord')

if __name__ == '__main__':
main()このコードを実行すると、カレントディレクトリにfashion_mnist_train.tfrecordとfashion_mnist_test.tfrecordが保存されるはずです。
TFRecordの中身を確認する方法
過去に書き出したTFRecordの中の構造が知りたい場合には、tf.train.Example.FromStringが便利です。
In [1]: import tensorflow as tf

In [2]: example = next(tf.python_io.tf_record_iterator("fashion_mnist_train.tfrecord"))

In [3]: tf.train.Example.FromString(example)
Out[3]:
features {
  feature {
  feature {
    key: "image"
    value {
      bytes_list {
        value: "\000...\000"
      }
    }
  }
  feature {
    key: "label"
    value {
      bytes_list {
        value: "\000...\000"
      }
    }
  }
}featuresの中にimageとlabelとheightとwidthのfeatureが入っているということが分かります。
TFRecordの読み込み方
TFRecordは、tf.parse_single_exampleを使用して読み込むことができます。BytesListで書き込んだものは、tf.stringで読み込むことに注意してください。
def read_tfrecord(filename):
    filename_queue = tf.train.string_input_producer([filename])
    reader = tf.TFRecordReader()
    _, serialized_example = reader.read(filename_queue)

    features = tf.parse_single_example(
        serialized_example,
        features={
            'image': tf.FixedLenFeature([], tf.string),
            'label': tf.FixedLenFeature([], tf.string)
        })

    image = tf.decode_raw(features['image'], tf.float32)
    label = tf.decode_raw(features['label'], tf.float64)

    image = tf.reshape(image, [28, 28, 1])
    label = tf.reshape(label, [10])

    image, label = tf.train.batch([image, label],
            batch_size=16,
            capacity=500)

    return image, label
実際に実装してみる
TFRecordにする前のデータとTFRecordにした場合で実際に実行してみます。Fashion MNISTの場合はそれほどデータ量が多くないので、全データメモリに入ってしまいますが、計算グラフへの入力部分が非同期になるはずです。
TFRecordを使用する
import numpy as np
import tensorflow as tf
import tfrecord_io
from tensorflow.examples.tutorials.mnist import input_data
from tensorflow.contrib import slim

def model(image, label):
    net = slim.conv2d(image, 48, [5,5], scope='conv1')
    net = slim.max_pool2d(net, [2,2], scope='pool1')
    net = slim.conv2d(net, 96, [5,5], scope='conv2')
    net = slim.max_pool2d(net, [2,2], scope='pool2')
    net = slim.flatten(net, scope='flatten')
    net = slim.fully_connected(net, 512, scope='fully_connected1')
    logits = slim.fully_connected(net, 10,
            activation_fn=None, scope='fully_connected2')

    prob = slim.softmax(logits)
    loss = slim.losses.softmax_cross_entropy(logits, label)

    train_op = slim.optimize_loss(loss, slim.get_global_step(),
            learning_rate=0.001,
            optimizer='Adam')

    return train_op

def main():
    train_images, train_labels = tfrecord_io.read_tfrecord('fashion_mnist_train.tfrecord')
    train_op = model(train_images, train_labels)

    step = 0
    with tf.Session() as sess:
        init_op = tf.group(
            tf.local_variables_initializer(),
            tf.global_variables_initializer())
        sess.run(init_op)
        coord = tf.train.Coordinator()
        threads = tf.train.start_queue_runners(sess=sess, coord=coord)
        while step < 3000:
            sess.run([train_op])

            if step % 100 == 0:
                print('step: {}'.format(step))

            step += 1

        coord.request_stop()
        coord.join(threads)

if __name__ == '__main__':
    main()
まとめ
今回の例では前処理やデータベースとのIOが発生することもなく、メモリ上にすべて展開できてしまうためにそれほどメリットはありません。
巨大なデータセットでデータのIOがリアルタイムで発生してしまう場合や複数マシンで分散学習する場合などはTFRecordにすることを検討してください。
さらにDataset APIを使用することで簡潔に書くこともできます。以前に紹介しているので、こちらも合わせて参考にしてください。
複雑な前処理も簡単に!TensorFlowのDataset APIの使い方 /tensorflow/2017/07/18/tensorflow-dataset-api.html
参考
- [1] Threading and Queues
- [2] Fashion MNIST